Global high-mix volume high-speed PCBA manufacturer
9:00 -18:00, Mon. - Fri. (GMT+8)
9:00 -12:00, Sat. (GMT+8)
(Except Chinese public holidays)
Global high-mix volume high-speed PCBA manufacturer
9:00 -18:00, Mon. - Fri. (GMT+8)
9:00 -12:00, Sat. (GMT+8)
(Except Chinese public holidays)
HomePage > Blog > Knowledge Base > Dry Solder Joints: How to Identify and Fix Them?
Solder joints are the core of electronic assembly, and good solder joints are the basis for ensuring good electrical and mechanical connections between components and circuit boards. However, not all solder joints are perfect. Different types of bad solder joints such as dry solder joints and broken solder joints, may occur during the soldering process, affecting the reliability of electronic equipment.
In this blog, we will take a detailed look at the information of the dry solder joint, including its definition, identification methods, causes, effects, prevention measures and repair tips.

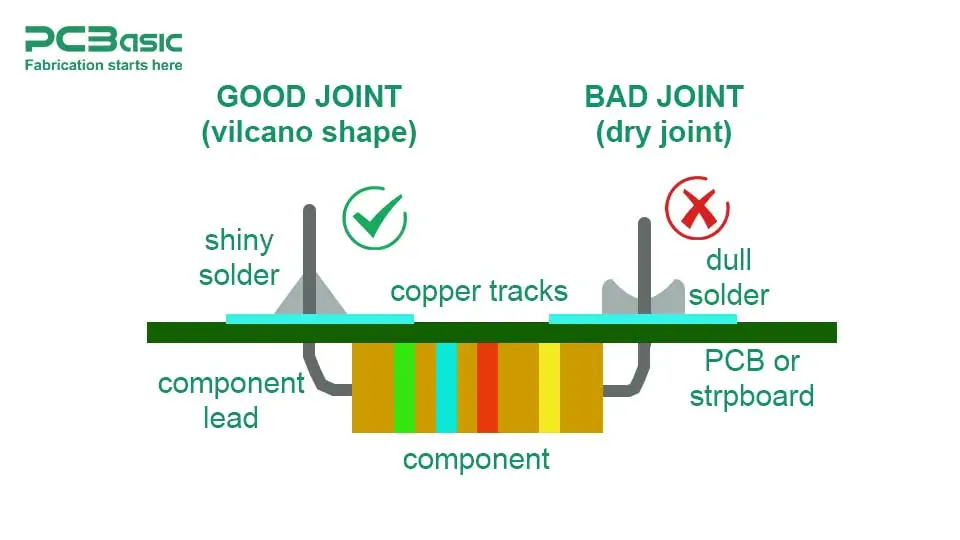
A dry solder joint, also called cold solder joint, refers to a solder connection where the solder has not fully melted during the soldering process, resulting in a weak solder joint connection. Usually, it is caused by insufficient heating or insufficient amount of solder used. If the solder does not flow fully and form a good connection to the PCB pad and component pins, it will leave a weak point, which can lead to intermittent failures or, in some cases, complete malfunction.
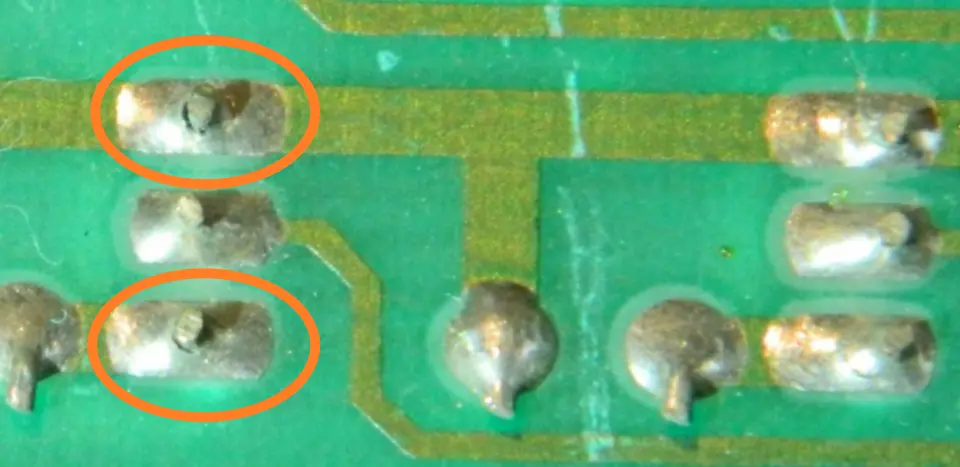
The appearance of dry solder joints is often different from that of normal solder joints. Normal solder joints should be smooth and shiny, while dry solder joints may appear dull, cracked, rough or irregular surfaces. These problems are usually due to the temperature is not high enough during soldering, or the amount of solder is not enough to fill the entire connection, resulting in incomplete connection between the component and the PCB.

Knowing how to identify bad solder joints is crucial for diagnosing and repairing electronic failures. Here are some key methods in this table:
|
Identification Method |
Check Results |
Possible Causes |
|
Visual Inspection |
Surface is dull, rough, or grainy |
Solder did not fully melt, insufficient heating |
|
Cracks or Fractures |
Visible cracks or fractures |
Mechanical stress or temperature changes over time |
|
Multimeter Test |
Intermittent or no conductivity |
Solder joint not fully connected |
|
Physical Movement Test |
Pin moves within the joint |
Solder joint is loose or insufficiently connected |
Dry solder joints have a variety of negative effects on the function and reliability of electronic circuits:
Intermittent failure: One of the main problems of dry solder joints is to cause intermittent failure of equipment. The solder joint may initially appear normal, but as the circuit becomes heated or vibrated, the solder joints may loosen or lose connection, causing the circuit to not work or behave erratically at certain times.
Increased resistance: Due to the poor connection of the dry solder joint, it usually leads to an increase in the resistance of the solder joint. High resistance means that the current is obstructed more as it passes through, potentially causing the circuit to overheat. This overheating can not only damage components but also cause serious problems such as short circuits or fires.
Device failure: Dry solder joints are often one of the causes of the complete failure of electronic equipment. If the solder joint is unable to provide sufficient current or signal transmission, the affected component may fail completely or even make the entire device unable to work.
Shortened component lifespan: Dry solder joints will cause mechanical stress to the components, especially in the case of temperature changes and vibration, which will accelerate the aging of the components. Over time, components with dry solder joints may fail, causing the device to break down earlier than expected.
These negative effects show the significant impact that dry solder joints can have on the long-term health and performance of a circuit, so ensuring high- quality soldering is critical to the stability and reliability of electronic devices.
Common causes of cold solder joints can be understood from the following aspects:
|
Cause |
Explanation |
Prevention |
|
Insufficient Heating |
Soldering iron temperature too low, solder won’t melt. |
Ensure proper soldering iron temperature and sufficient heating time. |
|
Poor Quality Solder |
Solder with impurities or expired, causing poor joints. |
Use high-quality, fresh solder. |
|
Improper Technique |
Insufficient heating or insufficient solder. |
Ensure even heating and use enough solder. |
|
Excessive/Insufficient Solder |
Too much solder can cause short circuits, too little makes the joint weak. |
Use the right amount of solder. |
|
Vibration/Movement |
Movement during soldering affects joint formation. |
Avoid moving or shaking components and PCB during soldering. |
|
Humid Environment |
Moisture causes the solder to cool prematurely, leading to cold joints. |
Keep PCB and components dry to avoid moisture. |
In general, dry solder joints are usually caused by inadequate or inappropriate soldering conditions. Therefore, by mastering the correct soldering skills, using high-quality solder and controlling the soldering environment, the occurrence of dry solder joints can be effectively avoided, and the soldering quality can be ensured.

Repairing dry solder joints is a relatively simple process, but it requires precision:
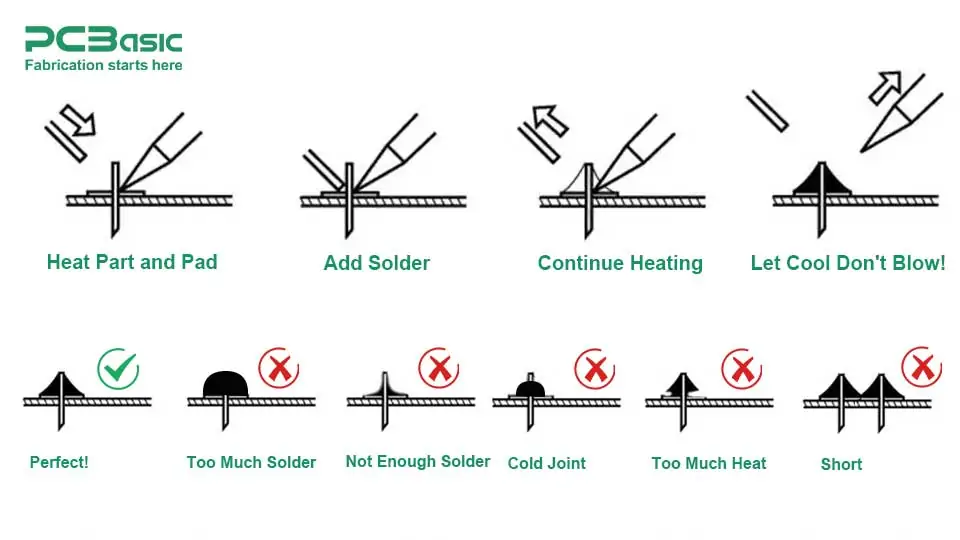
Reheat the solder joint: The first step in repairing a dry solder joint is to reheat the joint until the solder is fully melted. If necessary, add a small amount of fresh solder to improve the solder joint quality.
Remove old solder and re-solder: If reheating alone does not work, it may be necessary to use a de-solder chuck or de-solder strip to remove old solder and then re-solder. This is important because excess old solder can prevent the new solder from flowing properly and establishing a solid connection. After removing the old solder, reheat the joint and add fresh solder to ensure a secure and stable connection.
Clean the area: After re-soldering, clean the solder joint and surrounding area with isopropyl alcohol (IPA) to remove any residual flux, dirt, or oxides. These residues can interfere with new connections and may even affect the electrical properties of the solder joints. After cleaning, you can wipe the soldering area clean with a lint-free cloth.
Check for dry joints or cracks: After completing the solder repair, carefully inspect the joint for cracks, cold solder joints, or other signs of poor soldering. Cold joints typically appear rough, uneven, or with solder not fully flowing into the pad. If any issues are found, reheat the joint or add some extra solder to fix the connection and ensure it is firm and reliable.
Test the circuit: After repairing the cold solder joint, use a multimeter or other tools to test the circuit's continuity to ensure the repaired connection has stable electrical performance. If the circuit tests correctly, the repair is successful, and the solder joint is solid, allowing the circuit to function properly.
Following these steps will effectively repair cold solder joints and restore the reliability and electrical performance of the soldered connections.
Dry solder joints are a common problem in electronic devices, but with the right knowledge and technology, they can be easily identified and repaired. By understanding what causes bad solder joints, how to identify them, and how to prevent them, you can ensure the reliability and longevity of your electronic devices.

Assembly Enquiry
Instant Quote
Phone contact

+86-755-27218592
In addition, we've prepared a Help Center. We recommend checking it before reaching out, as your question and its answer may already be clearly explained there.
Wechat Support

In addition, we've prepared a Help Center. We recommend checking it before reaching out, as your question and its answer may already be clearly explained there.
WhatsApp Support

In addition, we've prepared a Help Center. We recommend checking it before reaching out, as your question and its answer may already be clearly explained there.
